About Mandy.

This blog is unlike any other you've seen. This blog is about all things that are passionate in my life that I wish to share with you! I love gardening, sewing, baking/cooking, playing video games, working on the computer/web designing, and much much more! Stay tuned!

Easy Garden Flag DIY Tutorial

Our poor A&M garden flag had seen better days (we had it for 4 years almost). I was trying to look around for a cute garden flag, but just couldn't find one. So, I decided to dust off the sewing machine and make my own. 


Here's what you'll need:
-1 yard of fabric: I bought a weather resistant, table cloth kind of fabric at hobby lobby. Although their selection was small, they had great pattern choices.

- 1/2 yard of burlap: if you want the contrast in the middle. Who doesn't love burlap? 

- letter: I ended up buying a foam letter in the crafting section. I was preferably wanting to find a wooden thin one, but I thought at least the foam would be more weather resistant

- 1 foot of ribbon at the bottom (or more depending on how much width you want)

-thread for sewing machine 

-hot glue gun 


First, I doubled the weather resistant fabric, so I not only had a loop, but It also gave the flag more weight. 

Next, I lined up the ribbon with my fabric to make sure the length will work.

Then I pinned the top across for the loop hole (see above). 

Start sewing! 

Sew all the way around, but make sure you have the loop holes open on both ends! 

Next, cut the how much burlap you want in the center. I didn't want a lot, just in the middle, but you can do whatever you want. I just wanted it where I could accent the letter. Next, Sew the burlap in the middle. 

Next, fire up the hot glue gun! I hot glued the letter onto the burlap, but make sure it's aligned correctly in the middle. After you lay the letter with glue on, go around and lift the edges. If they come up, use the hot glue gun to get more glue in the areas that may have not had enough glue. 

Lastly, hot glue the ribbon to the bottom of the garden flag. 

Let it dry for a few minutes. 

You're done! 


Easy homemade sugar cookies

It's that time of the year again, Christmas! 

Oh how I remember my mother baking away in the kitchen weeks before Santa's arrival. Whether the cookies and treats were for PTA, teacher gifts, neighbors and more. I never understood why she baked so much until now. 

This year, I thought I would make one recipe in particular I have a fond memory helping my mother in the kitchen, sugar cookies! No, not the kind you decorate with icing, but sweet, sugary cookies that melt in your mouth. 


The recipe is quite easy, and makes a ton of cookies (great for coworker gifts). 


Recipe: 

1 cup powdered sugar
1 cup white sugar 
1 cup margarine 
1 cup vegetable oil
2 eggs
1 tsp vanilla 
1 tsp baking soda
1/2 tsp salt
4 cup flour

Mix all together in mixer. Preheat oven to 350 degrees. 


Take little rolls onto greased baking sheet. Get a wine glass or stemware. Put sugar in bowl or something you can put bottom of stemware glass on. I used a cereal bowl and put some sugar in it. 


Take oil from cookies and put a little on bottom of stemware. Presd sugar onto bottom of glass and press lightly down into each ball on cookie sheet. Repeat for each cookie for sugary goodness.


Use little sprinkles to add color, if desired. 

Bake for 9-10 minutes. 


Enjoy!

-Mandy 

Who Needs A Paper List When There is Wunderlist!

I was noticing on Pinterest there were free printable travel lists that sparked me to write this post. I was informed at a Coca-Cola digital marketing meeting I attended that there was a wonderful "honey do" list app called Wunderlist. The woman said it was great for her and her husband's grocery shopping. 

I downloaded it immediately because my husband and I use to email each other what was needed at the grocery store since he does all the shopping. It's so simple. Download Wunderlist, and create a free, simple account. Next, have your husband, friend, parent, etc. download the app as well and create an account. You can have private lists or add friends, family, spouses to a list you can make. I created a grocery store list and added my husband:


After you create your list and want to add someone, press the button on the bottom right: 


Easy peasy! It's real time as well. So, when someone adds to the list you will receive a notification. 

It's great for organizing a trip list as well. No more paper! 

-Mandy

Easy Pumpkin Bread Recipe

The weather is FINALLY starting to cool off, you know what that means. Pumpkin bread!

I have fond memories of this recipe that my mom used to make every fall. The aroma in the house is so inviting and it's an amazing, easy gift that you can make for co-workers, teachers, family, etc. Just be sure to make a loaf for yourself/family.

This past weekend, I made the ol' original, traditional kind with nothing fancy on it. I've added chocolate chips to the top before baking, or mixed in crumbled pecans, but even just plain it's amazing.

Ingredients:
1 (15 oz) can of pumpkin puree
4 eggs
1 cup of vegetable oil
2/3 cup water
3 cups white sugar
3 1/2 cups all-purpose flour
2 teaspoons of baking soda
1 teaspoon of salt
1 1/2 teaspoon of ground nutmeg (sometimes I add more for flavor)
1 teaspoon ground cinnamon

Optional: mini semi-sweet chocolate chips (handful) and/or crushed pecans (1/2 cup)

Directions:
1. Preheat oven to 350 degrees. Grease and flour bottom of loaf pans (I have 2 long ones, but you can buy small aluminium foil ones for gifts).

2. In a mixer, combine pumpkin puree, eggs, oil, water and sugar until well blended. Add baking soda, salt, cinnamon, nutmeg. Slowly add flour to mixture. At this point, if you'd like to add crushed pecans, add into mixture.

3. Pour into prepared pans. If you'd like to be 'outgoing' and have mini chocolate chips, sprinkle some on the top. Your kids will LOVE it.

4. Bake for 50 minutes (said originally in recipe 60, but sometimes ovens vary from person to person and what kind of loaf pans). If you're unsure, just set the time for a time you feel is appropriate. Check loafs with toothpick in center. If clean, bread is ready!


You'll be so happy you have this recipe stored in your recipe book. It's an easy recipe to make lots of little loaves for your friends, family, co-workers, etc. Enjoy!

-Mandy

Game Day Snack Your Man Will Love!


So, I've finally convinced Andy to try a new jalapeño popper recipe so I could post on the blog. 

After his first bite, a nod and smile appears across his face. That's when I knew I had to share this recipe. Your husbands will thank you on game day. 

Ingredients:
-8 slices of bacon (if you're a bacon lover, you can do less if you want)
-16 one inch squared sliced jalapeños
-1 package of Philadelphia Cream Cheese
-pillsbury crescent rolls (8 count)

Directions:
1. Cook bacon as directed. Slice. 

2. Preheat oven to 375 (as directed on pillsbury dough). De-seed jalapeños and slice.  


3. Roll out crescents. Cut in half with pizza cutter depending on how big you want to make them. 


4. Cut a slice (teaspoon) of cream cheese, out on bottom, add bacon and add jalapeño on top.


5. Roll up dough to cover the yummy inside ingredients! 


6. Bake for 10-12 minutes. 

Cool. Enjoy! 


What's your husband or boyfriend's favorite game day snack? Share with me your recipe by commenting below!

-Mandy

Easy To Make Granola Bites!

Sometimes it's so difficult to find yummy, yet good for you snacks. Luckily, I stumbled across a recipe on Pinterest that caught my eye, yet I thought I would try and make some modifications. So here it is, yummy butterscotch granola bites!

The hubby also approves (and he usually only likes my yummy baking, but not very good for you recipes). 

Ingredients:

2/3 cups toasted coconut flakes (I had to toast mine for only 8 minutes in the oven until brown)
1 cup uncooked oats
1/3 cup honey
1/2 cup creamy peanut butter 
1/2 cup ground flax seed
1/2 cup butterscotch chips (or you could use chocolate chips instead) 
1 tsp vanilla extract 

I toasted my flaked coconuts to brown for right minutes. Do this while putting all other ingredients together (wait to out morsel chips in until last or they'll be gooey. 

Mix together...

Then roll them into little balls. Makes about a dozen and half. I put mine in Tupperware and keep in the fridge. 


Easy to make and healthy for you! 

-Mandy   

Everyone Loves Burlap!

Fall is officially here and that means football season is here for the Meadows' household.
Since my crafting abilities have been slowly improving, I thought I would take a shot at incorporating the oh-so-popular burlap wreath with my alma mater. At first, I had a difficult time trying to figure out what kind of wreath to make. Of course, I ventured onto Pinterest to find some inspirational ideas and took the one qualities I liked from each wreath I saw and made my own.


After making my own, I already have had one close family friend request a wreath. Not too shabby, eh? So I thought I would share with you the burlap, fun process (it’s really not that difficult!)
What you’ll need:
·         2 rolls of large burlap (Michael’s or Hobby Lobby)
·         1 medium sized wreath wire (looks green)
·         Any other ribbons you wish to add (I added maroon ribbon and more burlap chevron)
·         Small pieces of wire to tie your ribbon/burlap to the frame (You could even use paper clips if you want to!)

1.       You’ll notice the wire wreath has 3 lines. Cut a piece of wire (or use a paper clip or pipe cleaner) and wrap the beginning of your burlap on the bottom (3rd line).

2.       Now, grab more of your burlap and start scrunching it in a loop format into the 2nd line of wire wreath. Repeat. I did two loops per section of the wreath.

3.       Continue to loop and repeat once first batch of burlap is finished. You can also puff out the loops to make bigger, or smaller - Whichever you prefer.

4.       At this point, you’ll want to get whatever extra ribbon you want to put on and do the exact same thing, but have it spread out throughout the wreath and make sure not to do any loops too closely together. Luckily, if it looks strange, you can always re-arrange and retry.

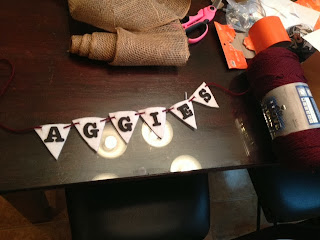
5.       I also thought I’d make a flag banner. I just bought some felt at Hobby Lobby, made a triangle cut out and used it as a guide (to keep all flags the same), and some foam letters and hot glued them together.

6.       Tada!


Great thing is, this wreath can be more of a ‘fall’ wreath as well and not be football related.

Share with me some burlap wreaths you like or have made! I love seeing new wreath ideas!

 
A Little of This & A Little of That © 2012 | Designed by Rumah Dijual, in collaboration with Buy Dofollow Links! =) , Lastminutes and Ambien Side Effects